No study of Ancient Egypt would be complete without discussing pyramids, pharoahs and of course mummies. We read and talked about the reason Egyptians created mummies as well as the process they used for this unique type of preservation. To finish up our week of studying about "The Old Kingdom of Egypt" we followed the directions for creating a mummy chicken of our very own. Mummification is a relatively lengthy process which takes approximately two months. That said, look for many updates on our mummy process to come! Here are the girls with all the ingredients needed to get started on our chicken mummy.
Because of bacteria it is recommended that gloves be worn during this process.
The first step is to wash the chicken with hot water and then dry it thoroughly. Kennedy jumped right in but once the chicken came out of the packaging and Reagan saw a little blood she was not at all certain she liked the idea of messing with this chicken in anyway.
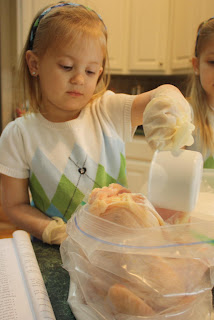
The next step is to pour rubbing alcohol (the Egyptians used wine) all over the chicken to help kill any remaining bacteria. Reagan agreed to pour the rubbing alcohol as long as Kennedy held the chicken for her. Kennedy had no problem dealing with the rubbing alcohol or the chicken.
After rinsing the chicken in the rubbing alcohol you have to completely and thoroughly dry the chicken. Again, Kennedy went right to work. Reagan refused to touch the chicken even though she had gloves and a towel so she wasn't even close to actually "touching" anything.
The reason the girls are looking so seriously into the chicken is because they were concerned about having to deal with chicken poop. I assured them this chicken was no longer capable of pooping because a) it's no longer eating and/or alive and b) there's nothing left inside the chicken to poop with. That prompted the need to look inside and make sure there was no poop or anything that could create the aforesaid poop...
Egyptians used a salt which came from the Nile called natron for the mummification process. Since natron is not readily available for purchase at your local grocery store (I can't imagine why - isn't everyone mummifying their chickens!?!?!) you can create something similar by mixing salt, baking soda and baking powder. The girls loved the texture and it's quite smokey, if you will. I don't know which of the ingredients creates that effect or if it's the combination or amount we're using, but we were all surprised by the effect it produces in the air.
After mixing up the substitute natron you place some in the bottom of a large ziplock bag, place the chicken in the bag, fill the chicken with the mixture and then completely surround the chicken.
Finally, you place the first sealed ziplock bag in a second large ziplock bag and let time take its course! Not really, you have to make sure the chicken stays dry and change the salt relatively frequently during the first week. This process was relatively easy though and very easy for the girls to manage primarily on their own. Stay tuned with us over the next 6 weeks as we watch how time and natron preserve our chicken. Our final step will be to actually wrap the chicken to create a true mummy. Fun times! :)
The girl's favorite suggested reading from the week was
"Magic TreeHouse: Mummies in the Morning" by Mary Pope Osborne (Random
House 1993). A number of the books from the suggested reading list and available at the library for this week were
a bit thick. We found that "The Best Book of Mummies" by Philip
Steele (Kingfisher, 2005) did the best job of explaining mummies and their signifigance on a level the girls could understand and enjoy.


No comments:
Post a Comment